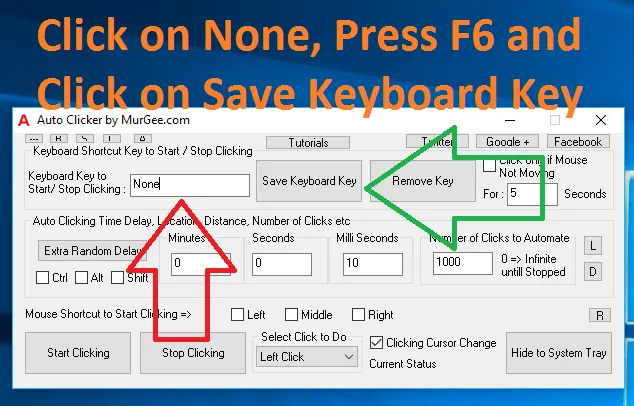
Easiest way to Start / Stop Automatic Mouse Clicking of Auto Clicker is to Assign a Keyboard Shortcut. This post outlines the method to assign a Keyboard Shortcut in Auto Clicker to Start and also Stop Automatic Mouse Clicking. The Automatic Mouse Clicking automatically stops after clicking finite number of times as configured in the software. Given below Screenshot displays how you can use F6 as a Keyboard Shortcut to Start / Stop Clicking of Auto Clicker.

Note that the Keyboard Shortcut assigned here is treated as a System Wide Keyboard Shortcut and works even when the Auto Clicker is minimized or is not in focus. Follow given below steps to get your first Keyboard Shortcut assigned to the Start / Stop Automatic Mouse Clicking:
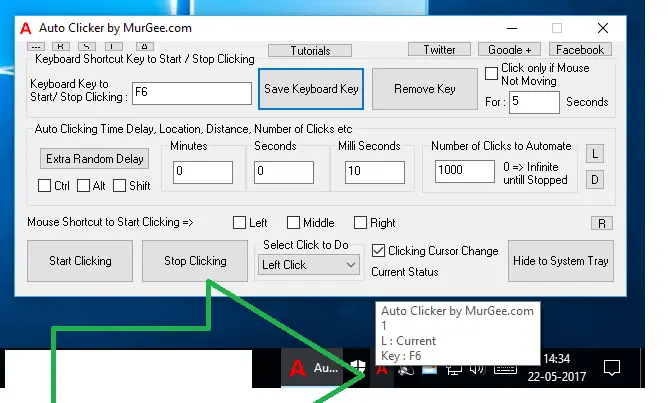
Given below Screenshot displays F6 being assigned as a Keyboard Shortcut to Start / Stop Auto Clicking. You can verify the Keyboard Shortcut Assigned to any Instance by hovering Mouse over the Icon in Notification Area. The given below Screenshot displays Icon of Auto Clicker in Notification Area and also the same Keyboard Shortcut is being displayed in the Main Screen of the Software.

The Keyboard Shortcut assigned here works in 2 different ways as mentioned below:
The Keyboard Shortcut is valid only until the Application is running, when you close or quit the Application, the Keyboard Shortcut will become free to be used by some other Application. When you want to change the keyboard Shortcut to do Automatic Mouse Clicking, you can click on the button Remove Keyboard Key and follow the procedure mentioned above again to assign a new Keyboard Shortcut.
Download Free Trial of Auto Clicker on Windows 11, Windows 10, etc and to Click Faster in any Windows Application.
Introduction to Auto Clicker Mouse Shortcut to Start / Stop Automatic Mouse Clicking
Navigate to Home Page of Auto Clicker Tutorials and Learn How you can Use Auto Clicker to perform Automated Mouse Clicking on Windows 11, Windows 10, etc.